Canon Powershot SD430 Guia de Configuração
Consulte online ou descarregue Guia de Configuração para Software Canon Powershot SD430. Canon PowerShot SD430 Software Starter Guide Manual do Utilizador
- Página / 130
- Índice
- RESOLUÇÃO DE PROBLEMAS
- MARCADORES
- Software & Wireless Guide 1
- North America 2
- Other Regions 2
- READ CAREFULLY BEFORE USING 3
- Table of contents 5
- Using the PDF Manuals 6
- Read This First 7
- Like a Pro 8
- Print the images 9
- Send images to the computer 10
- Software 12
- Edit a Movie 13
- Extract Stills from Movies 13
- System Requirements 14
- Windows Programs 15
- Macintosh Programs 15
- Precautions when Connecting 16
- Platform – Preparations 17
- Windows XP 18
- 5 Click [Next] 19
- Platform – The Basics 23
- 2 Download the images 24
- Direct Transfer menu 25
- Memory Card Reader Connection 26
- Printing Images 28
- 4 Click [3. Print] 29
- Layout Print 30
- The ZoomBrowser EX Windows 34
- Task Area 35
- Folders Area 35
- Browser Area 35
- Display Mode 36
- Display Control Panel 37
- Function Buttons 37
- Viewer Window 38
- Properties Window 39
- ZoomBrowser EX Features 40
- Internet 42
- Replaying Movies 43
- Editing Movies 44
- Instructions 45
- Assist mode 45
- Camera Settings 46
- The My Camera Window Features 47
- 2 Download images 54
- [Preferences] 56
- 5 Click [Print] 59
- Layout Print Window Features 60
- The ImageBrowser Windows 61
- Explorer Panel 62
- Control Panel 64
- File Information Window 66
- ImageBrowser Features 67
- Functions Selected from Menus 68
- Starting PhotoStitch 72
- The My Camera Window 74
- Add an Original Sound File 77
- Computer and Camera 78
- Operating System Environment 79
- Existing Network 80
- Wireless LAN Router 80
- Checklist 81
- Power Button 82
- Playback 82
- 4 Press the camera's M 83
- 6 Press the F 83
- 7 Click [Next] 83
- Connecting 89
- 4 Press the button (or F 90
- Disconnecting 91
- Deleting a Target Device 92
- Commands (Direct Transfer) 94
- 2 Press the F 95
- 3 Press the F 96
- 5 Click [Settings] 98
- 7 Click [Finish] 98
- Preparing for Remote Shooting 99
- RemoteCapture Task Window 100
- Remote Shooting 101
- 3 Click the [Release] button 101
- 2 Press the camera's M 102
- 4 Select [On] and press the M 102
- 5 Shoot the image 103
- Connection Difficulty 104
- Check the 105
- Firewalls 109
- Before Contacting Us 110
- Appendices 111
- ZoomBrowser EX 112
- ImageBrowser 112
- Uninstalling the Software 113
- Memory Card Folder Structure 116
- Troubleshooting 118
- Windows XP and Windows 2000 120
- Windows Me/Windows 98 SE 123
- Information about Your Camera 127
Resumo do Conteúdo
WirelessWindows/Macintosh• This guide explains how to install the software programs and briefly introduces their functions and operating procedures. •
Read This First6Wireless for Greater Convenience If you are using Windows XP SP2, you can use a wireless connection to send images to the computer and
Using the Wireless Networking Function96RemoteCapture Task Window The RemoteCapture Task window has the following features.RemoteCapture Task locks th
97Remote Shooting1Click and check the subject in the viewfinder.2 Change the image size or resolution, the rotation settings and the settings at the
Using the Wireless Networking Function98Automatically Saving Images to the Computer while Shooting (Auto Transfer)This section explains the function f
995 Shoot the image.The image will be recorded onto the memory card and then sent to the computer. The transferred image will display on the computer.
100Wireless Connection Troubleshooting Please read this section if you cannot connect the camera and computer over a wireless network or you are havin
101"Connection failed 2" and "Connection failed 3" MessageCauseWireless network settings are incorrect. The registration of the ta
Using the Wireless Networking Function102"Connection failed 4" MessageCause 1Connection broken because of poor wireless networking environme
103"Connection failed 5" MessageCause 1Connection confirmation signal processing failed.Solution 1:Enable the UPnPTM service in your firewal
Using the Wireless Networking Function104"Connection failed 7" MessageCauseMore than approximately 1000 images in the camera, you may not be
105FirewallsFirewalls protect computers from security threats, such as computer viruses and unauthorized external access. However, some firewall setti
7Wireless (p. 98)Operate the Camera Shutter from the Computer You can use ZoomBrowser EX to operate the camera shutter from the computer to shoot imag
Using the Wireless Networking Function106Before Contacting UsIf you experience a problem, please follow the suggestions below. If these do not resolve
107AppendicesThis chapter introduces the CD-ROM supplied with your camera and the procedures for installing the programs. It also explains how to unin
Appendices108Starting ArcSoft PhotoStudio You can start ArcSoft PhotoStudio from within ZoomBrowser EX (Windows) or ImageBrowser (Macintosh).ZoomBrows
109Uninstalling the SoftwareThe procedures for uninstalling the software are only required when you wish to delete the programs from your computer or
Appendices110Uninstalling the USB Driver (Windows)Uninstall the USB Driver using the following procedures if you are using Windows 2000, Windows Me or
1115 Delete your camera model name or [Canon Camera] in the [Scanners and Cameras Properties] dialog.Windows Me users should delete their camera model
Appendices112Memory Card Folder StructureThe images on a memory card are placed in the [DCIM] folder in subfolders labeled [xxxCANON], where the “xxx”
113Method for Downloading to a Computer without Additional SoftwareThis explains the method for downloading images to a computer without installing Zo
Appendices114TroubleshootingPlease read this section if you encounter a problem using the software.See Wireless Connection Troubleshooting (p. 100) fo
115Add New Hardware Wizard or New Hardware Found (Windows 2000) Wizard displays when the camera is connected to the computer with an interface cable.C
Read This First8Unbounded Possibilities with Entertaining Software Print a Variety of LayoutsPrint with the diverse layouts available in ZoomBrowser E
Appendices116Cause 4:The camera may have been recognized as another device under the following circumstances (Windows only).• The camera was connected
1173. Click the symbol beside the [Other devices] and/or [Imaging devices] category. Your camera model name or [Canon Camera] will display in these
Appendices1188. Look for files for Canon digital cameras that start with [CAP*]. The “*” represents a number, such as 0 or 1. [CAP*] files come in pai
119Reinstall the driver.11.Reinstall the driver with the procedures in Installing the Software and USB Driver (p. 13).Windows Me/Windows 98 SE Check t
Appendices1208. Find and delete the [DRVDATA.BIN] (or [Drvdata.bin]) and [DRVIDX.BIN] (or [Drvidx.bin]) files.9. In the [INF] or [Inf] folder, double-
121Reinstall the driver11.Reinstall the driver with the procedures in Installing the Software and USB Driver (p. 13).Zooming Images in ZoomBrowser EX
Appendices1224. Use Windows Explorer to copy the folder and the images it contains from the [Program Files] folder to another folder.(e.g. Copy the im
123Information about Your CameraThe software package and the procedures for connecting to a computer and preparing for data transfers vary between cam
Index124IndexAAccess point ... 76, 102, 103, 104Actions Possible with the Camera Connected to a Computer... 89Ad hoc co
125LLayout PrintMacintosh... 54Windows ... 26MMAC Address ...
9Send an Image as an E-mail AttachmentAttach an image to an e-mail message by starting your mail software from within ZoomBrowser EX (Windows) or Imag
Index126UUninstalling SoftwareMacintosh... 111Windows ... 109USB DriverUninstalling
Read This First10System RequirementsPlease install the software on a computer meeting the following minimum requirements.WindowsWindows XP (excluding
11Programs and Compatible Operating SystemsThe CD-ROM labeled “Canon Digital Camera Solution Disk” is provided with all models. It contains the follow
Read This First12Before You Connect the Camera to the ComputerPrecautions when Connecting• The connection may not operate correctly if you attach the
13Using the Software on the Windows Platform – PreparationsThis chapter explains the basic procedures for installing the software and connecting the c
Using the Software on the Windows Platform – Preparations143 Place the Canon Digital Camera Solution Disk in the computer’s CD-ROM drive.If the instal
155 Click [Next].6 Select [Easy Installation] as the setup type and click [Next].Select [Custom Installation] to select programs individually for inst
The precautions noted within this guide are intended to instruct you in the safe and correct use of the products and to prevent injuries or damage to
Using the Software on the Windows Platform – Preparations168 Review the installation settings and click [Next].Follow the onscreen instructions to pro
1711 Attach the camera to the computer with the interface cable and set the camera to the correct mode for connecting.If the Digital Signature Not Fou
Using the Software on the Windows Platform – Preparations18Windows 2000/Windows Me/Windows 98 SE Restart the computer according to the instructions if
19Using the Software on the Windows Platform – The BasicsThis chapter explains the procedures for using ZoomBrowser EX to download the camera's i
Using the Software on the Windows Platform – The Basics202 Download the images.Download the images using the camera or the computer. By default, the d
21Using the Camera to Download Images (Direct Transfer Function)Set the Direct Transfer settings on the camera and press the (Print/Share)button or
Using the Software on the Windows Platform – The Basics22By default, when downloading is complete, the thumbnails (tiny versions) of the downloaded im
233 Click [Starts to download images].You can adjust the settings, such as the type of image downloaded and the destination folder, by clicking [Prefe
Using the Software on the Windows Platform – The Basics24Printing ImagesThere are three ways in which images may be printed: One Photo per Page Print,
252 After confirming that [1. Select Images] is selected, select images.You can select multiple images by holding the [Ctrl] down while clicking on su
iCanon Software License AgreementIMPORTANT - READ CAREFULLY BEFORE INSTALLING THE SOFTWARE! This document is a legal agreement ("Agreement"
Using the Software on the Windows Platform – The Basics26Layout PrintThis option uses the PhotoRecord printing utility to arrange multiple images on a
273 Click [2. Select Captions for Printing] and place a check mark beside the type of information that will be printed with the images.If you select [
Using the Software on the Windows Platform – The Basics285 Click [2 Select Printer & Album Type]. Once you have chosen a printer, select [Free For
298 Click [4 Print], confirm the number of copies and other printing settings, and click [Print]. This will start printing. To close PhotoRecord after
30Using the Software on the Windows Platform – Advanced TechniquesThis chapter explains various ZoomBrowser EX features. Proceed to this chapter once
31Task Area • ZoomBrowser EX's tasks are arranged here like an index.• Click a Task button to carry out the desired task.These features are descr
Using the Software on the Windows Platform – Advanced Techniques32Display Mode• Selects the display style for the Browser Area.Zoom ModeDisplays all t
33Display Control Panel • This panel adjusts the display settings for the Browser Area.Function Buttons• These buttons are available for executing var
Using the Software on the Windows Platform – Advanced Techniques34Viewer WindowDouble-click an image in the Browser Area to display it in the Viewer W
35Properties WindowThe Properties Window displays when you select an image in the Browser Area and click the Properties button. The Properties Window
iiHowever, if you are provided with the Software as stored in a medium, Canon warrants the medium to be free from defects in materials and workmanship
Using the Software on the Windows Platform – Advanced Techniques36ZoomBrowser EX FeaturesThis section briefly introduces the Task Area functions.Acqui
37EditEdit ImageAllows you to perform image editing, such as cropping, image correction and red-eye correction. You can also use it to start other ima
Using the Software on the Windows Platform – Advanced Techniques38PrintOne Photo per Page PrintPrints one image per page (p. 24).You can print "p
39Replaying Movies1 Double-click an image with a movie icon in ZoomBrowser EX’s Browser Area.The Viewer Window will open and play the movie. Windows 2
Using the Software on the Windows Platform – Advanced Techniques40Editing MoviesYou can create and edit movies: link movies and stills that have been
41Merging Panoramic Images - PhotoStitch You can create a wide panoramic image by merging several images. It is easier to merge images if they are sho
Using the Software on the Windows Platform – Advanced Techniques42Enjoy Customizing Your Camera with the My Camera SettingsThe start-up image, start-u
43The My Camera Window FeaturesZoomBrowser EX already contains several pre-recorded My Camera settings. You can check these items with the My Camera w
Using the Software on the Windows Platform – Advanced Techniques44Saving the My Camera Settings to the Camera1 Select the [Setup as a theme] tab in th
45Adding New Data to the My Camera WindowCreate a new image or sound file and add it to the My Camera window.• Adding Image and Sound Files After Crea
1Table of contentsRead This First 3It’s so Simple! Make Prints Right at Home Like a Pro ... 4Wireless for Greater Convenience ...
Using the Software on the Windows Platform – Advanced Techniques464 Once you have saved the file, click and close the My Camera Maker window.You hav
47Using the Software on the Macintosh Platform – PreparationsThis chapter explains the basic procedures for installing the software. Read this materia
Using the Software on the Macintosh Platform – Preparations485 Select [Easy Installation] and click [Next].Select [Custom Installation] to select prog
49Using the Software on the Macintosh Platform – The BasicsThis chapter explains the procedures for using ImageBrowser to download the camera's i
Using the Software on the Macintosh Platform – The Basics502 Download images.Download the images using the camera or the computer. By default, the dow
51By default, when the download is complete, the thumbnails (tiny versions) of the downloaded images display in ImageBrowser’s Browser Window.Continue
Using the Software on the Macintosh Platform – The Basics52If it does not open, click the [CameraWindow] icon in the Dock (the bar at the bottom of th
53Printing ImagesThere are three ways in which images may be printed: One Photo per page Print, Index Print and Layout Print. This section explains th
Using the Software on the Macintosh Platform – The Basics543 Set the categories as you feel necessary.4 Click [Print].The Print window will now open.5
553 In the Print Style category, select [Custom layout printing] and set the categories as you feel necessary.4 Change the layout or add text as you f
Table of contents2Connecting ...85Disconnecting ...
Using the Software on the Macintosh Platform – The Basics56Layout Print Window FeaturesWhen the [Custom layout printing] option is selected in the Lay
57Using the Software on the Macintosh Platform – Advanced TechniquesThis chapter explains various ImageBrowser features. Proceed to this chapter once
Using the Software on the Macintosh Platform – Advanced Techniques58Explorer Panel • Use this area to select folders. The images in the selected folde
59Display Mode• Selects the display style for the Browser Area.PreviewThis mode displays the image at a larger size as well as the image information.
Using the Software on the Macintosh Platform – Advanced Techniques60Display Control Panel • This panel adjusts the display settings for the Browser Ar
61Viewer WindowDouble-click an image in the Browser Area to display it in the Viewer Window.• If a RAW image is displayed, the [Show Original Image] b
Using the Software on the Macintosh Platform – Advanced Techniques62File Information WindowThe File Information Window displays when you select an ima
63ImageBrowser FeaturesThis section provides a brief introduction to ImageBrowser features.Control Panel FeaturesCanon CameraOpens the Camera Control
Using the Software on the Macintosh Platform – Advanced Techniques64PrintOne Photo per page PrintPrints one image per page (p. 53).You can print "
65Display Settings: [View] menu, [View Settings]Hides or shows image information beneath the thumbnail, such as the file name or the shooting date and
3Read This FirstThis chapter explains what you can accomplish using the camera with the software contained on the Canon Digital Camera Solution Disk.
Using the Software on the Macintosh Platform – Advanced Techniques66Replaying Movies1 Double-click an image with a movie icon in ImageBrowser’s Browse
67Editing MoviesYou can create and edit movies: link movies and stills that have been downloaded to your computer, add background music, superimpose t
Using the Software on the Macintosh Platform – Advanced Techniques68Merging Panoramic Images - PhotoStitch You can create a wide panoramic image by me
69Enjoy Customizing Your Camera with the My Camera SettingsThe start-up image, start-up sound, shutter sound, operation sound, and self-timer sound ar
Using the Software on the Macintosh Platform – Advanced Techniques70The My Camera WindowImageBrowser already contains several pre-recorded My Camera s
71Saving the My Camera Settings to the Camera1 Select the type of setting in the Type list box that you wish to save to the camera.2 Select the settin
Using the Software on the Macintosh Platform – Advanced Techniques72Adding New Data to the My Camera WindowCreate a new image or sound file and add it
73Add an Original Sound FileChange the file to a WAV sound file after you have copied the sound file to the computer. Then proceed with the steps as d
74Wireless Network Settings for the Computer and Camera This chapter explains how to configure the wireless networking function to connect the camera
75Preparation-Before You Use the Wireless ConnectionThis section explains the preparations to make before you use the wireless connection.Start by che
Read This First4It’s so Simple! Make Prints Right at Home Like a Pro See your Camera User Guide for shooting instructions.Just install the software on
Wireless Network Settings for the Computer and Camera76Checking Your Wireless Connection ConfigurationThe method for connecting the camera to the comp
77Checking Your Wireless Network Configuration (Configuration Only)If you are already using a wireless network, check the following settings and not
Wireless Network Settings for the Computer and Camera78Registering the Target Device with the CameraAttach the camera to the computer using the interf
794 Press the camera's MMENU button.5 Select the [ (Wireless)] menu in the camera's LCD monitor and choose [Reg. Target Device].6 Press the
Wireless Network Settings for the Computer and Camera808 Select [Simple Mode] and click [Next].We recommend you use the Simple Mode for most purposes.
819 Select [I am using an access point] and click [Next].This window will not appear if the wireless configuration information is automatically detect
Wireless Network Settings for the Computer and Camera8212 After confirming the displayed settings, click [Print] to print out the configuration conten
839 Select [I do not have an access point, but my computer is compatible with wireless networks] and click [Next].This window will not appear if the w
Wireless Network Settings for the Computer and Camera8412 After confirming the displayed settings, click [Print] to print out the configuration conten
85ConnectingConnect to the computer using the camera controls. You will not require an interface cable because you are connecting wirelessly.Connect a
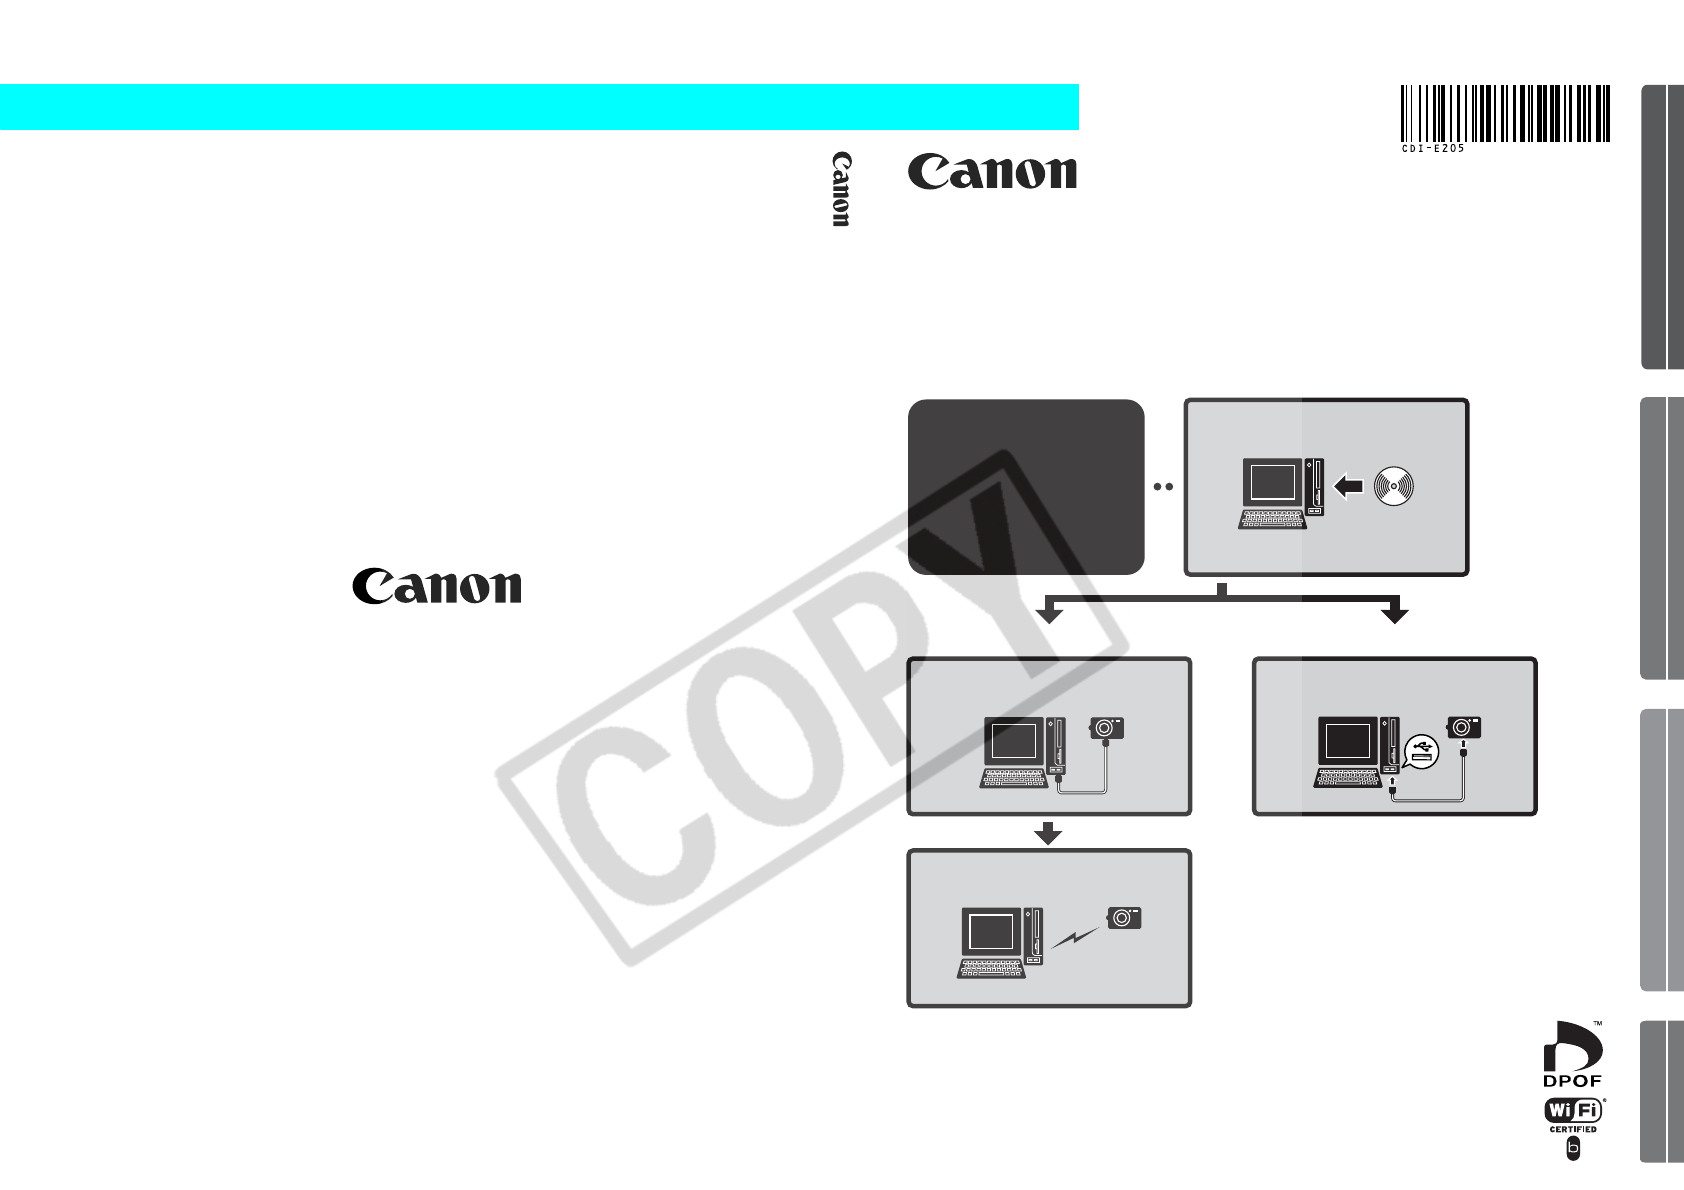
5Download images to the computerPrint the imagesConnect the camera to the computerWindows (p. 19)Macintosh (p. 49)Windows (p. 24)Macintosh (p. 53)Prec
Wireless Network Settings for the Computer and Camera863 After you have selected a target device, select [Connect].The name registered for the target
87DisconnectingDisconnect the camera from the computer using camera commands.1 Set the camera to the playback or shooting modes.2 Press the MMENU butt
Wireless Network Settings for the Computer and Camera88Deleting a Target DeviceDelete a target device if its registration is no longer required or you
89Using the Wireless Networking FunctionThis section explains how to use the wireless networking function to download camera images to a computer and
Using the Wireless Networking Function90Downloading/Printing Images Using Camera Commands (Direct Transfer)This section explains the procedures for do
91All Images, New Images2 Press the FFUNC./SET button.The menu will appear at the bottom left of the LCD monitor.3 Select [All Images] or [New Images]
Using the Wireless Networking Function92Transfer Image, Wallpaper, Print2 Display the image on the LCD monitor. Only the image displayed here will be
93Printer Settings for Printing via a Computer"Printing via a computer" involves using camera commands to automatically print images without
Using the Wireless Networking Function944 Set the destination folder for downloaded images and the creation method for new folders for downloaded imag
95Shooting from a Computer (Remote Shooting)You can shoot still images by operating the camera shutter remotely from a computer over a wireless connec
Manuais e produtos relacionados com Software Canon Powershot SD430
 (134 páginas)
(106 páginas)
(104 páginas)
(110 páginas)
(22 páginas)
(142 páginas)
(71 páginas)
(157 páginas)
(156 páginas)
(84 páginas)
(98 páginas)
(140 páginas)
(37 páginas)
(106 páginas)
(139 páginas)
(21 páginas)
(309 páginas)
(74 páginas)
(5 páginas)
(134 páginas)
(106 páginas)
(104 páginas)
(110 páginas)
(22 páginas)
(142 páginas)
(71 páginas)
(157 páginas)
(156 páginas)
(84 páginas)
(98 páginas)
(140 páginas)
(37 páginas)
(106 páginas)
(139 páginas)
(21 páginas)
(309 páginas)
(74 páginas)
(5 páginas)
© 2020, manymanuals-pt.com. Todos os direitos reservados. | 0.017 s |
 Manymanuals.com
 Manymanuals.de
 Manymanuals.fr
 Manymanuals.it
 Manymanuals.pl
 Manymanuals.cz
 Manymanuals.es
 Manymanuals-pt.com
Comentários a estes Manuais